
Soil nailing is a modern geotechnical technique used to stabilize soil and support excavations. Engineers apply the soil nailing method/technique to reinforce slopes, retaining walls, and deep excavations. In practice, soil nail wall installation involves drilling holes, inserting steel bars, and grouting them to create a stable system. Soil nailing design focuses on nail length, spacing, and angle to provide maximum strength and safety. This method is part of wider soil stabilization techniques that improve ground performance and prevent failures. The soil nailing benefits are clear: it is cost-effective, fast to construct, and flexible for many site conditions. Soil nailing combines efficiency and reliability, making it a preferred choice for infrastructure and construction projects worldwide.
Soil nail walls are used as permanent earth-retaining structures in highway projects. They can also be constructed as temporary structures in roadway work when used as shoring of deep excavations.
Table of contents
Components of soil nailing and its function
Components mainly constitutes installing passive reinforcement without any post tensioning in existing ground know as nails. Soil nails are later grouted if they are installed in drilled holes. Soil nails using solid bar drilling system do not need grouting. Hollow bars, such as the sacrificial hollow bar system, drill and grout simultaneously and also do not require additional grouting. Let us go in detail each and every component of soil nailing system.

Tendons
They are the ground reinforcing elements and are equivalent to steel bars. Tendons can take care of tensile stress developed during the lateral movement and deformation of retained soil and also the external loads in the service stage such as surcharge loads and traffic loads.
There are two methods of fixing soil nails or reinforcement bars.
a) Engineers drill holes and pressure grout them with fully threaded bars embedded inside.
b)Engineers use sacrificial drill bits to simultaneously drill and grout, converting the sacrificial drill bit into rebar.
b) Grout
Normal OPC cement mixed with water is used for grouting. The function of grout are
a) Transfers shear stress between the ground and tendons and
b) Corrosion protection for rebars.
Soil Nail wall Installation of facing
The installation of a soil nail wall is a top-down process. Every nail is installed with either anchor or bearing plates. After excavating the initial surface layer, you install the first row of soil nails. Excavate further and install the second layer of as per design. After completing a reasonable height at which soil can free stand ( 1-2mtr) for at least 2 -3 days the next phase of the shotcreting process will start.

d) First face shotcrete on soil surface
Following the nail installation, workers place a geotextile drain matting over the soil, then they follow it with a layer of welded wire mesh as shown in the figure. Workers sometimes provide rebar stiffeners to strengthen the shotcrete against punch shear forces. Upon completion of the first phase of shotcreting, they install bearing plates with beveled washers over the shotcrete surface.
e) Second phase of reinforced concrete
As required by the design, workers cover the first layer with a second phase of reinforced concrete, as the figure shows. This concrete then covers the nail heads.
Applications of soil nailing method
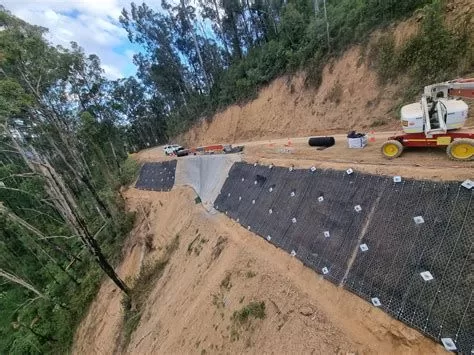
This technique is one of the most economical and feasible tops to bottom constructed retaining walls system. They are technically feasible, fast, and reliable slope protection and earth retaining system. They offer a perfect cost-effective system for temporary retaining walls for deep excavations..

- High way cut excavation of hilly areas
- Road widening under an existing bridge end.
- Repair and reconstruction of existing retaining structures.
- Temporary or permanent deep excavations in urban areas.
Feasibility of soil nails
Before confirming the soil nail system please ensure the following parameters at the site.
- Soil should be able to free stand at a height of around 1-2 mtr unsupported for a minimum of two days.
- All Soil Nails within a cross-section will be above the water table.
- If the soil nails are not located above the groundwater table, the groundwater should not negatively affect the face of the excavation, the bond between the ground and the soil nail itself.
- Engineers can use soil nails for almost all types of soil, including stiff/sandy/hard clay, dense sand and gravel areas, and evenly weathered rocks.
- Therefore, you should avoid using this method in dry, poorly graded cohesion-less earth, and areas with a high groundwater table. Similarly, it is not suitable for earth with cobbles and boulders, soft to very soft fine-grained soils, highly corrosive soils, or weathered rock with unfavorable weakness planes.

Advantages/benefits over other retaining systems
- They require very little workspace comparing with any other retaining systems.
- The operations are mostly light and silent and there is no disturbance to the traffic and people residing nearby.
- These type of retaining walls do not need any foundation or any structural whaler beams at the bottom like cantilever and anchored retaining walls.
- Using this method, we can reduce the duration of work and consume fewer materials.
- These systems are flexible and easily customizable, and we can easily adjust their location if we encounter any obstructions.
- We use small equipment for installation work.
- They can accommodate differential settlements and deflection of soil nails are usually within tolerable limits.
- This method is more cost-effective than other retaining wall systems because it uses shotcrete of minimal thickness instead of heavy structural walls.
Conclusion
Soil nailing technique is a versatile method for reinforcing slopes and retaining walls. Furthermore, it offers significant advantages in various geotechnical applications. For instance, it is particularly useful for highway projects, deep excavations, and slope stabilization. In these scenarios, this systems provide crucial support to prevent landslides and erosion. The technique’s minimal workspace requirements, cost-effectiveness, and adaptability to different site conditions therefore make it a popular choice in construction.
On the other hand, soil nails are most effective in soils that can stand unsupported for short periods. Consequently, they should be used with caution in cohesion-less soils or areas with high groundwater levels. Overall, this system offers a reliable solution for stabilizing slopes while maintaining project timelines and budgets.


One thought on “Soil Nailing: Method, Design, Installation, and Benefits”
Comments are closed.